SEC504: Hacker Tools, Techniques, and Incident Handling
SEC504Offensive Operations

As a follow up to my SANS webcast, which you can view here, I wanted to post detailed instructions on how to use KAPE to collect triage data and generate a mini-timeline from the data collected. As much as I hate to say "push button forensics", once you get KAPE up and running, it really is only a matter of a couple of clicks and you are off to the races.
I won't go into detail here on the benefits of collecting triage data or timelining (of which there are many!), but instead focus on how to set up KAPE to do it. If you would like more details on the above, please watch my webcast.
To get the timelining to work in KAPE you will need to do three things to get it set up. These will each be detailed in this post:
As KAPE gets updated, I expect step #2 to drop off as it will be rolled out with the newer versions.
KAPE (Kroll Artifact Parser and Extractor) is a free tool written by Eric Zimmerman, and available for download on the Kroll website. From the website:
To this end, I have written a target that defines what files to collect to create a timeline, and about 20 modules that tell KAPE how to process the data - AKA - make a timeline.
In order to do this, you will need to grab the new target and timeline modules and the binary files that the modules call.
If you don't have KAPE, download KAPE from here.
If you already have KAPE, you will need to have version 0.8.6.3 or greater. To update KAPE, run the Get-KAPEUpdate.ps1 PowerShell script in the root of the KAPE directory.
The Targets in KAPE define what files will be collected. The Modules define what executable will be ran against the files that are collected.
To grab the latest Targets and Module from github, run gkape.exe and click the "Synch with GitHub" at the very bottom of KAPE. This will get you the latest Targets and Modules.
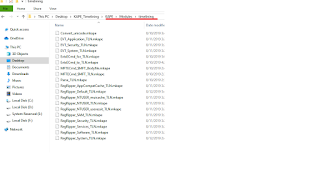
The timeline modules I created should be in the \Modules\timelining subfolder. If you do not have this folder after syncing (Eric was working on implement the syncing of module subfolders at the time of this blog post) you will need to grab the timelining folder directly from github.
The timelining modules will call specific executable to run against the targets. For example, if we want to parse out the eventlogs, the program EvtxEcmd.exe is called by KAPE to parse the artifact. The executables are placed in the KAPE bin folder:
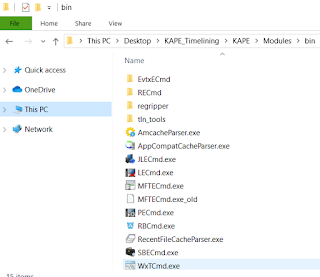
For the timeline modules, here are the executable you will need to download, and the locations where they go under the bin folder:
Purpose: Parse $MFT file
Download: https://ericzimmerman.github.io/
Instructions: should already be in \modules\bin. Tested with version 0.4.4.4
Purpose: Parse out *.evtx event logs
Download: https://ericzimmerman.github.io/
Instructions: should already be in \modules\bin\EvtxECmd folder. Make sure you have version 0.5.1.0 or newer as the older version will not work for timelining.
Purpose: Run regripper plugins against various registry hives
Download: https://github.com/keydet89/RegRipper2.8
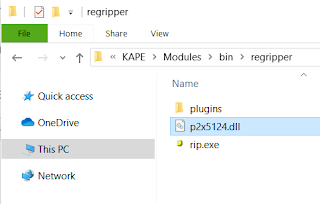
Instructions: Make folder \modules\bin\regripper. Place rip.exe , "p2x5124.dll" and the plugins folder in the regripper folder:
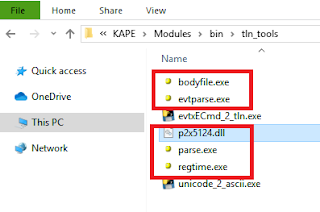
Purpose: parse event logs, timeline registry hives, convert timeline formats, etc.
Download: https://github.com/keydet89/Tools/tree/master/exe
Instructions: Create the folder \modules\bin\tln_tools. Place bodyfile.exe, evtparse.exe, parse.exe, regtime.exe and p2x5124.dll in the \tln_tools folder.
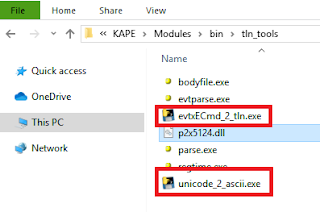
Purpose: Convert between file formats
Download: https://github.com/mdegrazia/KAPE_Tools/tree/master/executables
Instructions: Place in the tln_tools folder created previously
Once you have the the targets,modules and executables set up, you can generate a timeline.
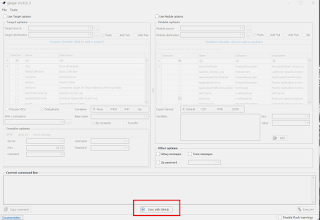
First, run the Target options in KAPE to grab the triage data. This can be done on a mounted image, or an external USB drive attached to the system of interest. You could even use something like F-Response to run KAPE to do a remote collection.
Target Source: The drive letter you want to collect the files from. On a mounted image, this would be the drive letter that the image is mounted as. For a live collection, this would most likely be C:
Target Destination: This would be where you want the files copied to. Most likely an external drive for a live collection, or a folder on your analysis computer for a mounted image.
Targets: Select MiniTimelineCollection
Hit execute when ready:

KAPE will now copy all the required files and place them into the Target Destination folder.
Now that the targets are collected, the modules will need to be run against the collected files.
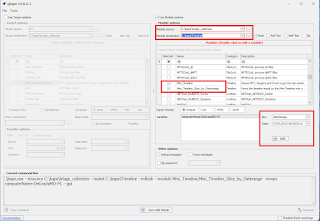
Module Source: This will be where the files were copied to by KAPE
Module Destination: The will be where the resulting timeline will be created
Modules: Select Mini_Timeline and if desired, Mini_Timeline_Slice_by_Daterange. The daterange will give you a smaller timeline with a specified date range.
Variables: Add two variable by using the Key and Value fields. computerName and dateRange. computerName will be the name of the system you are analyzing. The dateRange will be the dateRange you want the smaller timeline to have. This has to be in the format mm/dd/yyyy-mm/dd/yyyy.
Once completed, select execute:
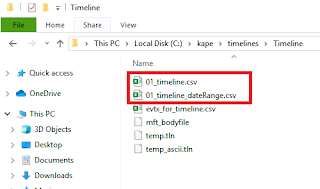
After running, you will have two timelines created in CSV format. The other files created are temporary working files created during the process. These CSV files can be opened using a text editor, TimelineExplorer, Excel, or any other CSV tool of your choice. If you want some more details on how to do the timeline analysis, and where to get started with analysis of these files watch my webex towards the end.
I highly recommend reading Harlan Carvey's blog posts on timelineing, as KAPE is just a way to automate this process.
Here is a detailed breakdown of what the timeline targets and modules I created are doing:
$MFT
Registy hives (SAM,SECURITY, SOFTWARE, SYSTEM, NTUSER.DAT, UsrClass.dat)
Event logs (*.evt, *.evtx)
File MACB timestamps
Last write times of the above registry hive's keys
ReRipper plugins ran: muicache, userassist, AppCompatCache, Services
Event Logs with Event ID and descriptions
For more detailed information on KAPE, including how to write modules and targets, check out the KAPE documentation.