SEC504: Hacker Tools, Techniques, and Incident Handling
SEC504Offensive Operations

This is Part 1 of a 3-part Series on Using PowerShell for Continuous Audit & Compliance Automation in Enterprise & Cloud

This is the first of a three-part series on using PowerShell for audit and compliance measurements. These blog posts supplement the material presented in the free webcast series "PowerShell for Audit, Compliance, and Security Automation and Visualization".
When I started performing IT audits in the early 2000s, it was a much simpler time! Physical servers were the norm. Administrators would manually configure each server and rack it up in the on-premise data center. If I asked "where are your Exchange servers?" they would take me to the data center and point out the physical machines.Back then, I could take the time to manually review the settings on each server, or I could take a week to perform a software audit without interfering with the development schedule. Then came virtualization, the cloud, agile, lean, Dev-Ops, site reliability engineering.
Today, I use scripting and automation wherever I can, just so I can keep up with the developers and administrators (or site reliability engineers). Whenever I can, I use PowerShell for my measurement scripts. It's more cross-platform than ever before, and it is designed for handling structured data formats like CSV, XML and JSON. PowerShell Core is the cross-platform version of the language. It's currently in version 7.1 and available for Windows, MacOS and many Linuxes. It's based on the .NET Core framework (which is different, and slightly less mature than the Windows .NET framework). In this series, I'll explore some of the PowerShell tools which have made me much more efficient in my audit and compliance work. The first of those tools is Pester.
Pester describes itself as "the ubiquitous test and mock framework for PowerShell." Like the unit-testing frameworks your developers use, this module allows you to write suites of tests to run against a system.
Consider a simple example: The enterprise has decided to require certain local account settings on all Windows servers and workstations:
I can write a set of Pester tests to validate these settings on a system. First, I will create a PowerShell script named "RegSettings.tests.ps1." The Pester test script will contain "Description" and "Context" blocks, which will contain groups of tests. The tests are implemented inside of "It" blocks. The script to perform tests for these three policy requirements might look like this
#Describe blocks hold groupings of context blocks. I often use the Describe
#block to hold all the tests for a particular policy
Describe "Local Account Policies" {
#Context blocks are used to group related tests. Since all of our tests
#are for registry settings related to the user policy, we'll use
#a single Context block
Context "Registry Settings" {
#It blocks contain the individual tests. If you have a paragraph number from
#a policy, you can include it in the test name
It "Req 1 - Blank passwords are not allowed" {
#Get the relevant setting
$setting = (Get-ItemProperty "HKLM:\SYSTEM\CurrentControlSet\Control\Lsa").LimitBlankPasswordUse
#Policy calls for a value of 1
$setting | Should -Be 1
}
It "Req 2 - Disable LMHash" {
$setting = (Get-ItemProperty "HKLM:\SYSTEM\CurrentControlSet\Control\Lsa").NoLMHash
$setting | Should -Be 1
}
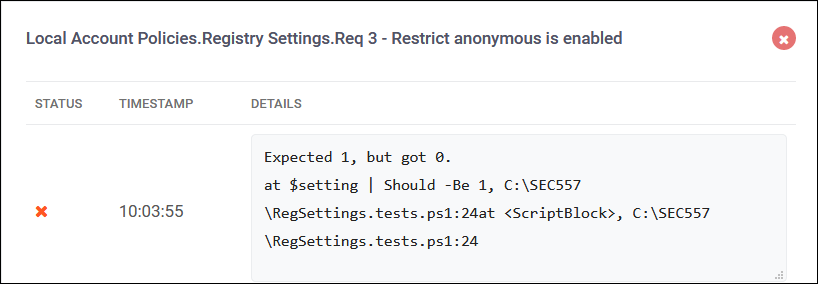
It "Req 3 - Restrict anonymous is enabled" {
$setting = (Get-ItemProperty "HKLM:\SYSTEM\CurrentControlSet\Control\Lsa").RestrictAnonymous
$setting | Should -Be 1
}
}
}I can now use the Invoke-Pester PowerShell command to run the tests:
Invoke-Pester -Path .\RegSettings.tests.ps1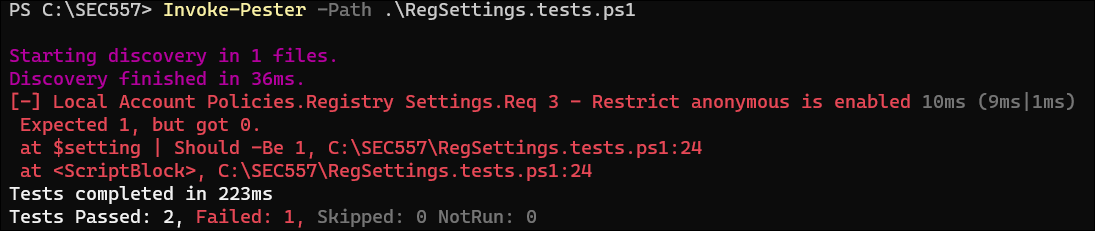
Pester can provide a custom PowerShell object with contains information about the tests run. This is as simple as using the "Passthru" parameter on the command line when I run the tests. I can capture that output and import it into a dashboard or calculate the percentage of tests which failed.
Invoke-Pester -Path .\RegSettings.tests.ps1 -PassThru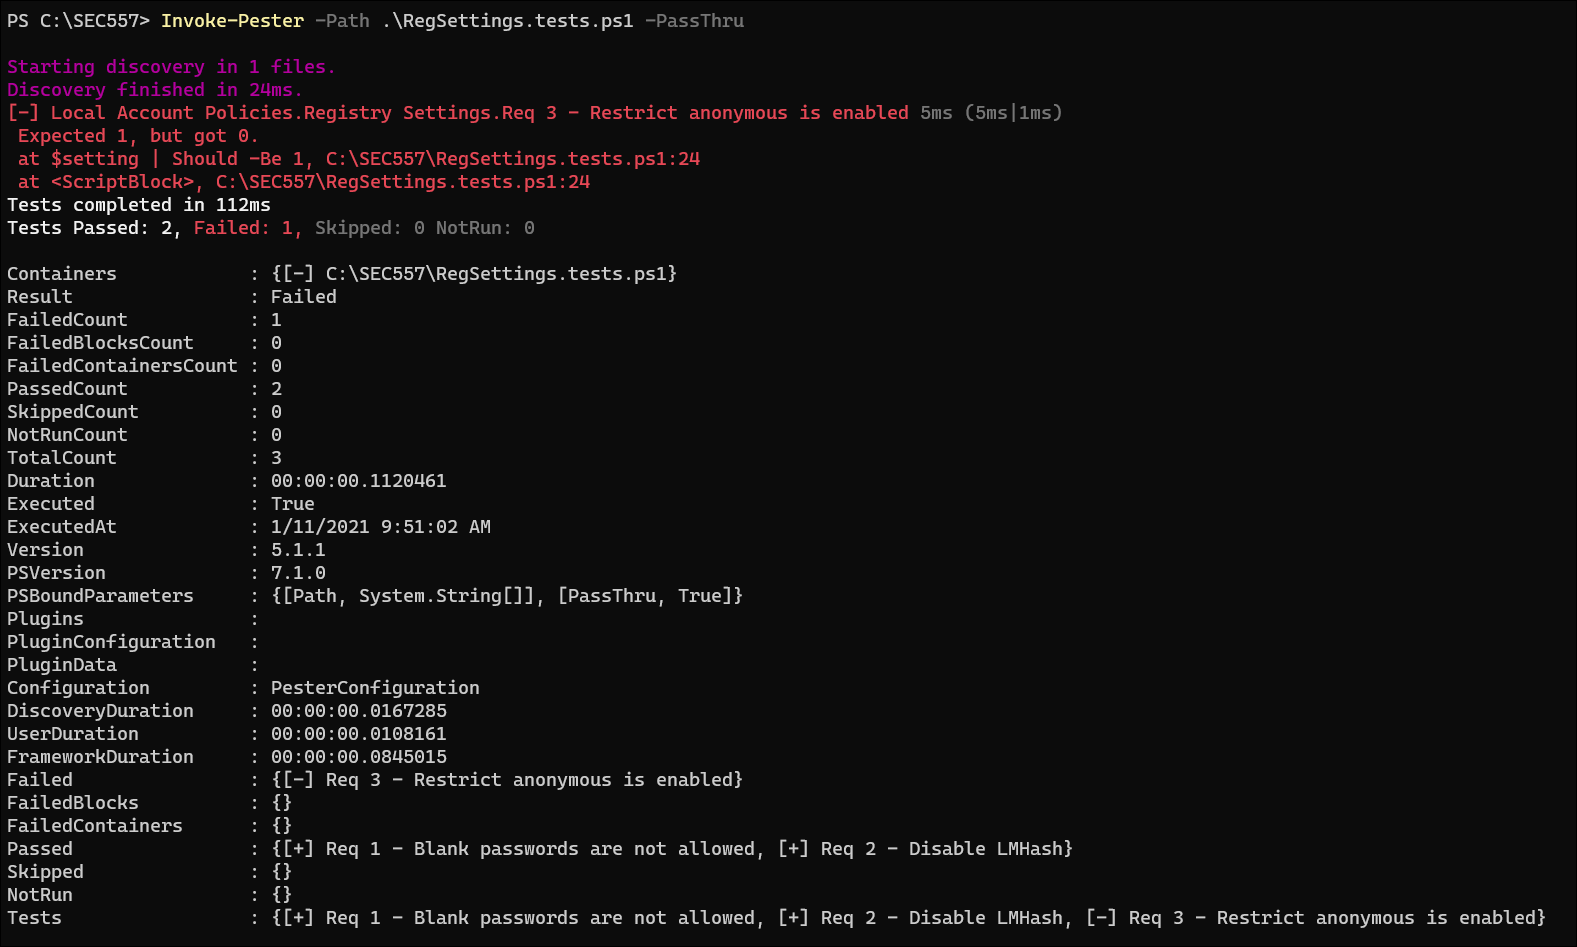
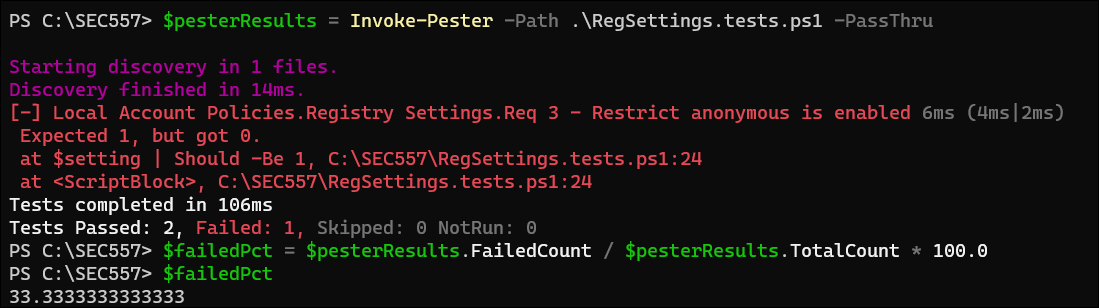
I can save the passed-through object from a Pester run into a variable to make it easier to process the results. If I wanted to see the percentage of tests which failed, I might do something like this:
#Save the results into a variable
$pesterResults = Invoke-Pester -Path .\RegSettings.tests.ps1 -PassThru
#Calculate the percentage of tests which failed
$failedPct = $pesterResults.FailedCount / $pesterResults.TotalCount * 100.0
#Output the results
$failedPct
In my consulting practice, we run tests like this daily against all the systems in an environment and ingest the results into a time-series database like Graphite, so we can visualize the results over time. Notice that in the previous example I calculated the percentage of tests which failed. We always use larger numbers to represent higher risk, i.e. a fully-passed test would result in zero percent, and a fully-failed test would result in 100 percent. You could use compliance, rather than risk, as your yardstick and have higher numbers be better. The important thing is to present the data consistently across your visualizations. Color-coding the results and using threshold lines in your dashboard can help to make "good" and "bad" results more obvious to the consumers.
Pester can be run inside your continuous integration (CI) pipelines by passing it a configuration object which instructs Pester to save the results in NUint format for further analysis. The PesterConfiguration object sets the options for which test scripts to run and how to save the results. Using this configuration, Pester will save the results of the tests into a file called testResults.xml. That file can be ingested by most CI tools to fail a build if the tests fail. This couple of lines of PowerShell code would create the Pester configuration and then run the tests.
<p>$config = [PesterConfiguration]@{
Run = @{ Exit = $false; Passthru = $true; Path = '.\RegSettings.tests.ps1'};
TestResult = @{Enabled = $true}
}
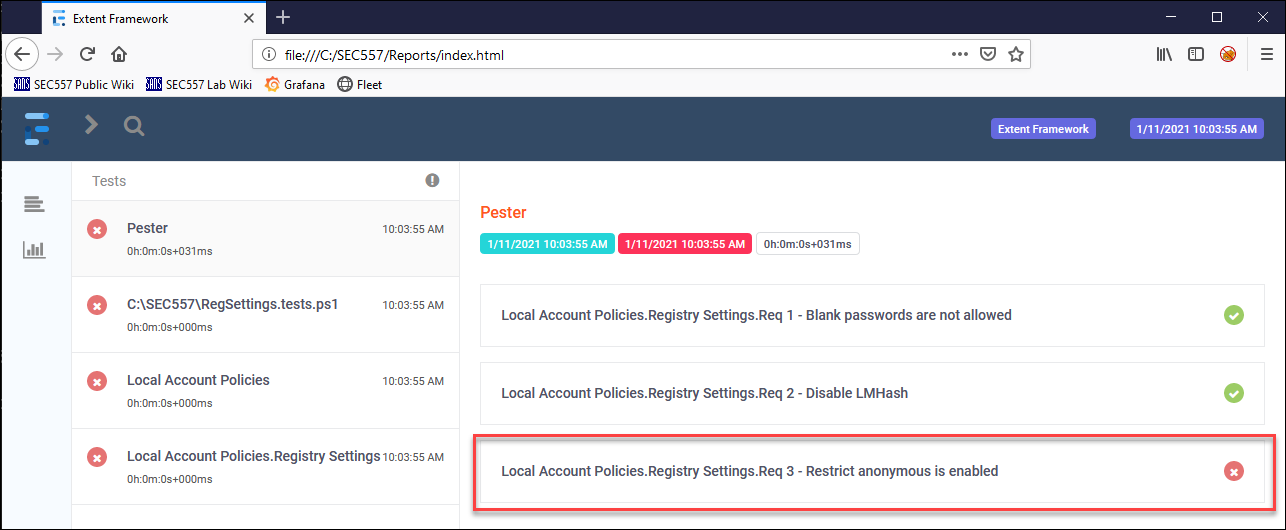
Invoke-Pester -Configuration $config</p>I can also use the XML results file to quickly generate an HTML report of the results of the test. For this, I use a tool called "ExtentReports" which converts the XML test results into two interactive HTML files.
Loading the resulting index.html into my browser gives me a nice overview of the results. The failed test on the right side of the page is clickable and gives me more information about the test which failed.
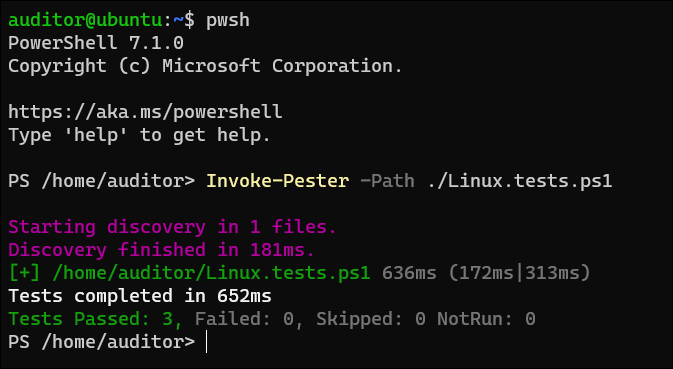
Since PowerShell Core is cross-platform, I can use Pester to test compliance on my Linux systems as well. The syntax is exactly the same and native Linux tools are available in the tests. Imagine that your enterprise has mandated that its Linux servers will be configured this way:
I could write Pester tests to verify all these settings. Notice that the "BeLike" keyword allows for wildcard matches on values. For a list of all the tests available in Pester, check out their documentation.
Describe "Local Linux Tests" {
   Context "Linux Configuraton" {
     #The the distribution installed on the server
     It "Req 1 - distribution is Ubuntu 20.04.1 LTS" {
       #Get the relevant setting
       $distro = (lsb_release -d)
       $distro | Should -BeLike '*Ubuntu 20.04.1 LTS'
     }

     It "Req 2 - Kernel version is 5.4.0-52" {
       $kernel = (uname -r)
       $kernel | Should -Be '5.4.0-52-generic'
     }

     It "Req 3 - Python is correct version" {
       $pythonVersion = (python3 -V)
       $pythonVersion | Should -BeLike '*3.8.5'
     }
   }
 }
It's not just my server and workstation operating systems that can be tested with Pester! If an API or PowerShell module exists for a product, I can wrap it with Pester tests to measure compliance of the system. In this final example, imagine that the enterprise is running VMWare ESXi version 6.5 in their datacenter. Side note for auditors and compliance professionals ESXi 6.5 is still supported, but if you are still using 6.5 instead of 6.7 or 7.0, it MAY indicate that your organization is using older hardware and can't use the newer versions. Management has mandated in policy:
Armed with these requirements, I can write a series of tests to run against the server. These tests will use VMWare's PowerCLI PowerShell module, which is capable of managing and querying all the VMWare infrastructure devices on your network. I like PowerCLI so much, I'll cover it in its own blog post. For now, just know that I need to authenticate to the VMWare infrastructure - normally by connecting to a VCenter server - and then I can run commands against the servers. In this example, I also demonstrate the use of "BeforeAll" and "AfterAll" script blocks, which allow setup and teardown of the testing environment. For more information on "BeforeAll" and other commands in the Pester module, take a look at the online documentation.
Describe "ESXi Tests" {
BeforeAll {
#Retrieve the server credentails from an encrypted file
$keyFile = ".\keyFile"
$credFile = ".\esxiCreds"
#Grab the key/token, decrypt the password and store it in a credentials object
$key = Get-Content $keyFile
$username = 'root'
$securePwd = Get-Content $credFile
$cred = New-Object System.Management.Automation.PSCredential -ArgumentList $username, ($securePwd |
ConvertTo-SecureString -Key $key)
#Create a connection to the server being tested
Connect-VIServer -server esxi1 -Credential $cred
}
AfterAll{
#Close any remaining open connections
Disconnect-VIServer * -Confirm:$false
}
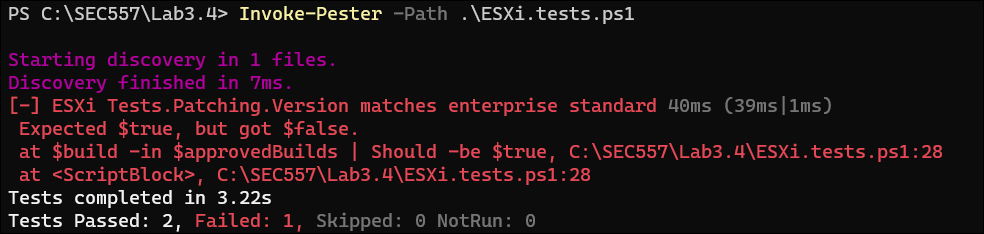
Context "Patching" {
It "Version matches enterprise standard" {
#List of approved build numbers for the enterprise
$approvedBuilds = '17167537','17097218'
$build = (Get-VMHost).Build
$build -in $approvedBuilds | Should -be $true
}
It "MegaRAID software is correct version" {
((Get-ESXCli -Server esxi1).software.vib.list()).ID -contains `
'VMW_bootbank_scsi-megaraid-sas_6.603.55.00-2vmw.650.0.0.4564106' |
Should -Be $true
}
}
Context "Server Settings" {
It "DNS servers are correct" {
$dnsservers = (Get-VMHost).Extensiondata.Config.Network.DNSConfig | Select-Object -ExpandProperty address
$dnsservers -contains '10.50.7.2' | Should -Be $true
}
}
}
I recommend that all professionals tasked with verifying the security of their enterprise learn to use PowerShell and tools like Pester to automate and simplify their work. Please come back next week to learn about more of the PowerShell tools and techniques that will help you to keep up with your fast-moving enterprise.
