SEC504: Hacker Tools, Techniques, and Incident Handling
SEC504Offensive Operations

In this article we'll look at the step-by-step process of scanning a cloud provider's network for target enumeration.

We used to rely on Nmap for all host enumeration, but with cloud networks there's too many potential systems to scan and effectively identify targets during a penetration test. Instead, I've adopted a set of steps that I follow when performing target discovery in a cloud provider's network. In this article we'll look at the step-by-step process of scanning a cloud provider's network for target enumeration.
First, two important notes:
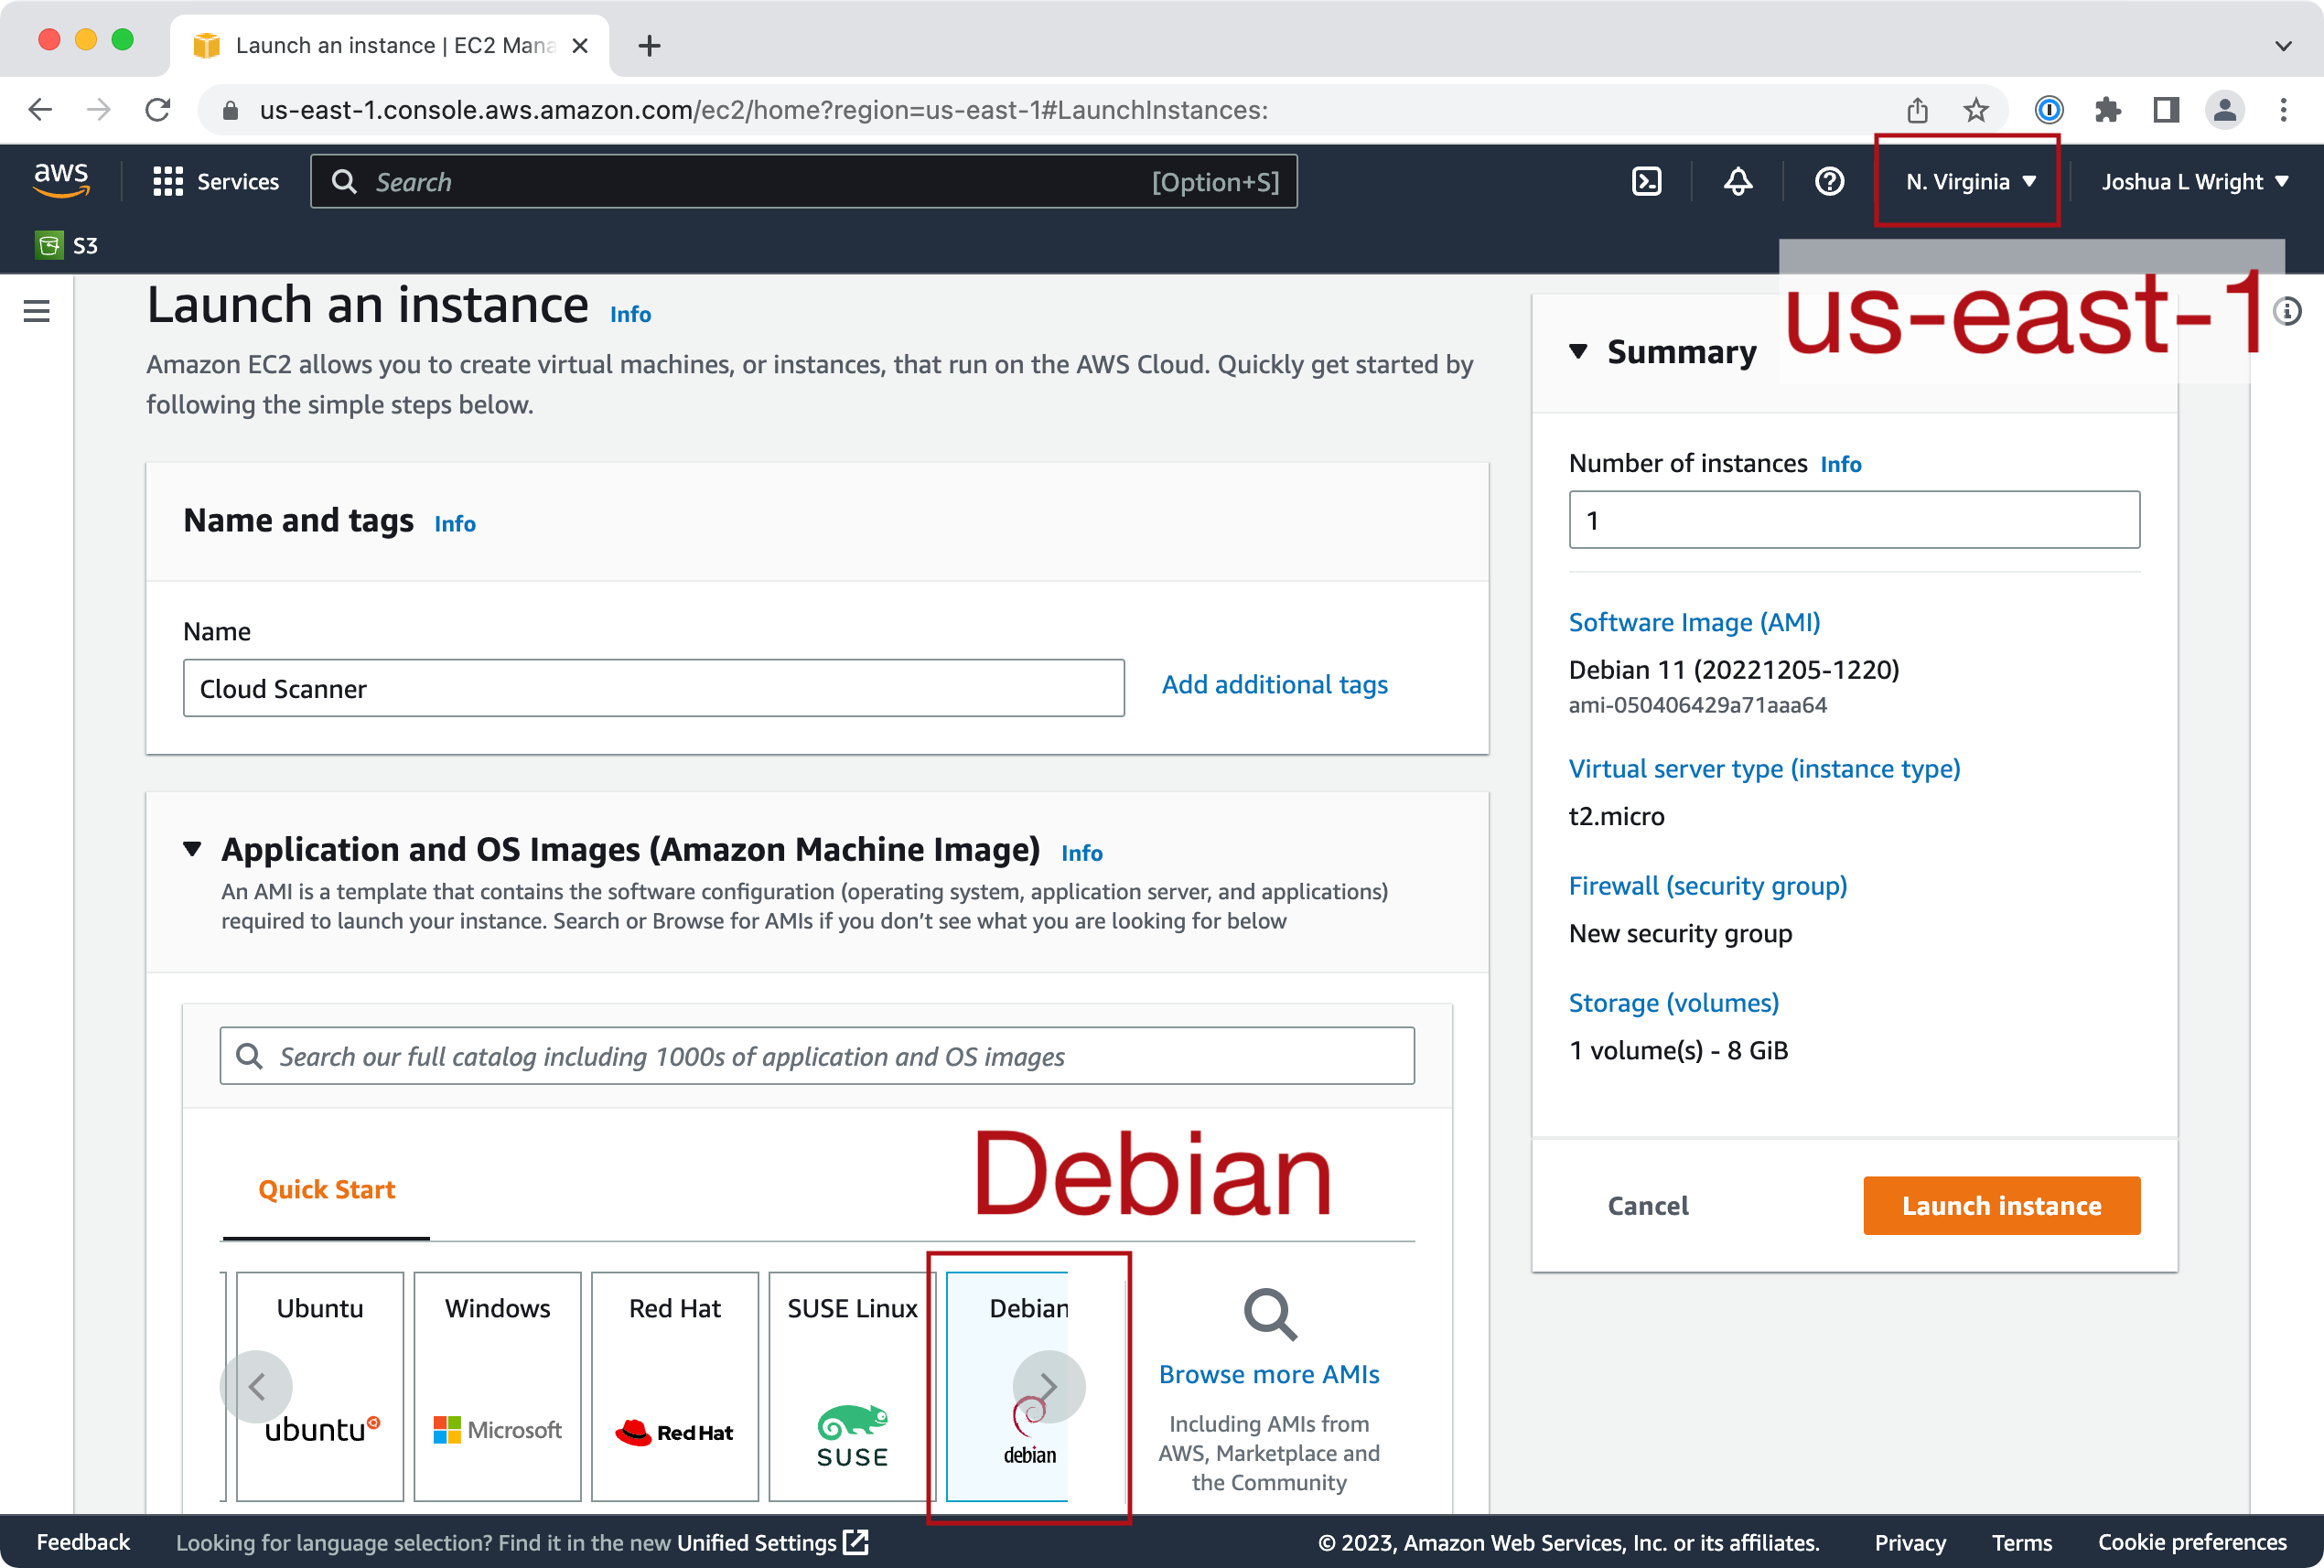
I'm going to use AWS and the us-east-1 region for my examples. Adjust as needed for your goals!
TIP: If you want to download a nicely-formatted version of this content you can grab the PDF here.
I used a generic Debian image for scanning purposes. No fancy AMI, just a plain Debian install.
When the system boots up, SSH in, then prepare the system with these steps (you can cut-and-paste this into the terminal):
sudo apt update && sudo apt -y install masscan jq
wget https://github.com/prbinu/tls-scan/releases/download/1.4.8/tls-scan-1.4.8-linux-amd64.tar.gz
sudo tar xvfz tls-scan-1.4.8-linux-amd64.tar.gz -C /opt
rm tls-scan-1.4.8-linux-amd64.tar.gz
wget -O tlsscanhostnames.py https://urls.sec504.org/tlsscanhostnamesraw
chmod 755 tlsscanhostnames.pyFollow these steps to scan the us-east-1 AWS region. These steps apply to other providers and regions as well; update the process below accordingly for your needs.
Download the list of IP addresses for AWS. Use [code]jq[/code] to retrieve only the IP prefix information for the us-east-1 range:
wget -qO- https://ip-ranges.amazonaws.com/ip-ranges.json | jq '.prefixes[] | if .region == "us-east-1" then .ip_prefix else empty end' -r | sort -u > us-east-1-range.txtThe IP address list should look like this:
$ head -4 us-east-1-range.txt
100.24.0.0/13
104.255.56.11/32
104.255.56.12/32
107.20.0.0/14Next, start a scan with Masscan for TCP port 443. Using a t2.micro EC2 instance I've been successful scanning at 100,000 packets per second, but you might want to increase this (especially for faster instances with more bandwidth) or lower for more reliability:
sudo masscan -iL us-east-1-range.txt -oL us-east-1-range.masscan -p 443 --rate 100000The output will look like this:
$ sudo masscan -iL us-east-1-range.txt -oL us-east-1-range.masscan -p 443 --rate 100000
Starting masscan 1.3.2 (http://bit.ly/14GZzcT) at 2023-01-04 15:37:05 GMT
Initiating SYN Stealth Scan
Scanning 787650 hosts [1 port/host]
rate: 32.97-kpps, 79.37% done, 0:00:04 remaining, found=4321When the scan complete you will have a [code]us-east-1-range.masscan[/code] file that records the systems listening on TCP/443:
$ head -4 us-east-1-range.masscan
#masscan
open tcp 443 107.22.83.44 1672846625
open tcp 443 107.23.215.252 1672846625
open tcp 443 100.24.81.235 1672846625
We want to convert this to just a list of IP addresses:
awk '/open/ {print $4}' us-east-1-range.masscan > us-east-1-range.tlsopenThe resulting file will look like this:
$ head -4 us-east-1-range.tlsopen
107.22.83.44
107.23.215.252
100.24.81.235
100.26.92.8Next we have to figure out the identities associated with the scanned systems. Fortunately, the certificate information for each identified system will disclose some identity information, often the hostname of the server.
To retrieve the identity information from certificates we can use TLS-Scan.
cat us-east-1-range.tlsopen | /opt/tls-scan/tls-scan --port=443 --cacert=/opt/tls-scan/ca-bundle.crt -o us-east-1-range-tlsinfo.json -t 3The output will look like this:
$ cat us-east-1-range.tlsopen | /opt/tls-scan/tls-scan --port=443 --cacert=/opt/tls-scan/ca-bundle.crt -o us-east-1-range-tlsinfo.json -t 1
elapsed-time: 0 secs | status: 4/4 | tls-handshake: 4 | target: 100.26.92.8          host: 100.24.79.57; ip: ; error: Network; errormsg:                      Error encountered while reading
elapsed-time: 0 secs | status: 23/23 | tls-handshake: 22 | target: 100.24.89.139          host: 107.23.173.123; ip: ; port: 443; error: Timeout
elapsed-time: 1 secs | status: 39/39 | tls-handshake: 37 | target: 100.25.59.81          host: 107.23.171.226; ip: ; error: Network; errormsg:                      Error encountered while reading
The resulting file will be a JSON blob:
$ ls -l us-east-1-range-tlsinfo.json
-rw-r--r-- 1 admin admin 12743546 Jan 4 15:49 us-east-1-range-tlsinfo.jsonThe JSON information discloses the TLS certificate details for each host including the certificate Common Name (CN). We can extract this data using JQ to make a CSV file:
cat us-east-1-range-tlsinfo.json | jq '[.ip, .certificateChain[].subjectCN]? | join(",")' -r > us-east-1-range-tlsinfo.csvThe output of the command will look like this:
$ head -4 us-east-1-range-tlsinfo.csv
107.22.83.44,*.unitedauto.cloverleafapp.com,Amazon,Amazon Root CA 1,Starfield Services Root Certificate Authority - G2
107.23.215.252,sym-ac8-dev-chat-glb-1.d.isym.io,Amazon,Amazon Root CA 1,Starfield Services Root Certificate Authority - G2
100.24.81.235,100.24.81.235,D2i WebAdmin CA
100.26.92.8,*.segurosbolivar.com,*.segurosbolivar.com
This JQ command is great for extracting name information from the Common Name field, but there are other name fields in the TLS certificate as well, such as the subject alt name. The [code]tlsscanhostnames.py[/code] script will apply some more complex checks to extract out more host name information:
$ ./tlsscanhostnames.py us-east-1-range-tlsinfo.json  | head -5
100.24.0.19:occedu.co
100.24.0.220:staging.k12.com
100.24.0.241:sew.timebyping.com
100.24.10.70:supabase.co
100.24.10.70:supabase.in
$ ./tlsscanhostnames.py us-east-1-range-tlsinfo.json > cloudtargets-attributed.txt
With the list of IP addresses and attribution information from the TLS certificate details, we can search for domain names, keywords, and other strings. For example, if I were authorized to test ring.com infrastructure, I might search for [code]ring.com[/code] in the [code]cloudtargets-attributed.txt[/code] file:
$ grep ring.com cloudtargets-attributed.txt
100.24.219.172:ring.com
107.20.38.8:ring.com
107.20.8.46:management.lightspeedordering.com
107.22.1.182:comms.avalonflooring.com
107.23.131.93:dev.emcscoring.comOnce the cloud scanning and identity enumeration is complete, we can choose the list of targets and more on to vulnerability discovery. Much of the analysis process here is the same as what you would apply to on-premises target systems (using vulnerability scanners, full port enumeration with Nmap, etc.), but there are a few concepts and tips I want to point out.
Often, the hosts identified during cloud scanning won't have public DNS records. For example, searching for Ring.com targets reveals multiple hosts (and some false-positive matches):
$ grep ring cloudtargets-attributed.txt  | head -10
100.24.208.96:my.ringling.org
100.24.219.172:ring.com
100.24.250.92:acessos.flamengo.superingresso.com.br
100.24.77.132:720427789759.us-east-1.prod.rms.ring.devices.a2z.com
100.24.77.132:us-east-1.prod.rms.ring.devices.a2z.com
100.25.243.62:engineeringvillage.com
100.25.243.62:www.engineeringvillage.com
100.25.32.18:839035386434.us-east-1.release.rms.ring.devices.a2z.com
100.25.32.18:us-east-1.release.rms.ring.devices.a2z.com
107.20.171.248:984380019471.us-east-1.prod.rms.ring.devices.a2z.com
Here we learn about the host at 100.24.77.132 which has two names extracted from the certificate: 720427789759.us-east-1.prod.rms.ring.devices.a2z.com and us-east-1.prod.rms.ring.devices.a2z.com. However, neither of these names are in public DNS:
$ host 720427789759.us-east-1.prod.rms.ring.devices.a2z.com
$ host us-east-1.prod.rms.ring.devices.a2z.com
$
Adding the hostnames (revealed from the certificate details) and the corresponding IP address in the [code]/etc/hosts[/code] file and accessing the target by the hostname may make a web server vhost accessible that would not be otherwise.
EyeWitness from Chris Truncer takes a list of host names or IP addresses and captures screenshots of the website, VNC, or RDP services on the targets. EyeWitness generates an HTML report as the output, which is easier to flip through to visualize the target websites.
$ python3 /opt/eyewitness/EyeWitness.py --web -f cloudtargets-attributed.txt --prepend-https
...

[*] Done! Report written in the /tmp/02212021_115954 folder!

Would you like to open the report now? [Y/n] Y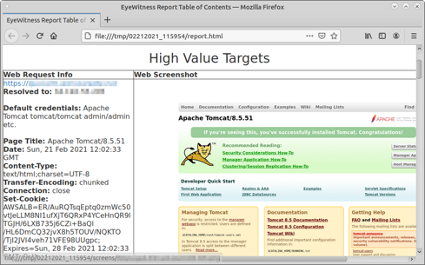
We can use a combination of Masscan, TLS-Scan, JQ (or [code]tlsscanhostnames.py[/code]) to rapidly scan lots of cloud systems. Remember the rules: always get permission, and make sure you scan within the same cloud provider and region for optimal performance.
With the list of discovered targets and TLS certificate information, we can perform attribution to identify target systems. Sometimes we have to manually edit local DNS as well to get web server vhosts to work as intended, but with a little tweaking we can discover and attack cloud systems using familiar tools: Nmap, vulnerability assessment scanners, EyeWitness, and more.
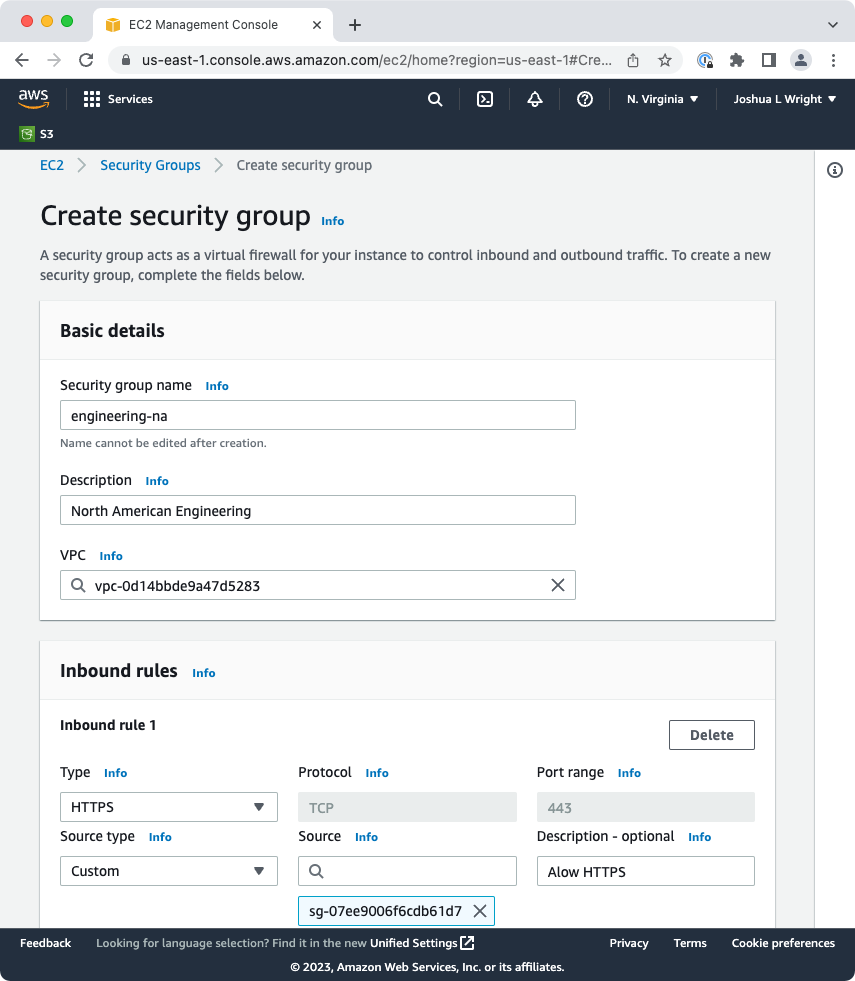
There are some things you can do to defend against this type of scanning and enumeration attack.
One option is to limit access to your cloud targets from unauthorized IP addresses using security groups and Network Access Control Lists. In AWS security groups have an implicit deny at the end of the list, so adding the permit rules will grant only access to designated sources for specified protocols.
Here's my advice: don't worry about scanning.
For sites that needs to be publicly accessible, it's a risk we accept as part of doing business. Using the techniques in this article, it is really hard to even detect someone doing this scanning on a per-host basis, and we seldom have a broad view of what is happening on the cloud provider's network to detect the scanning across lots of different hosts.
Instead, think about the ways you can protect your systems from the attacks that happen after scanning. Conventional tips apply here, such as keeping systems patched and using effective threat hunting techniques to detect threats on-premises and in the cloud.
Reach me on Twitter (@joswr1ght) or email josh@willhackforsushi.com.
Special thanks to the SANS Institute for allowing me to share this content. Check out my class SEC504: Hacker Tools, Techniques, and Incident Handling for more techniques and tools like the ones covered here. ✌️
